> ## Documentation Index
> Fetch the complete documentation index at: https://docs.migma.ai/llms.txt
> Use this file to discover all available pages before exploring further.
# Add DNS Records for a Sending Domain
> Two ways to set up a sending domain in Migma: quick or custom, including the DNS records you need to add.
Both methods start at **Sending Domains → Add Domain** in the sidebar.
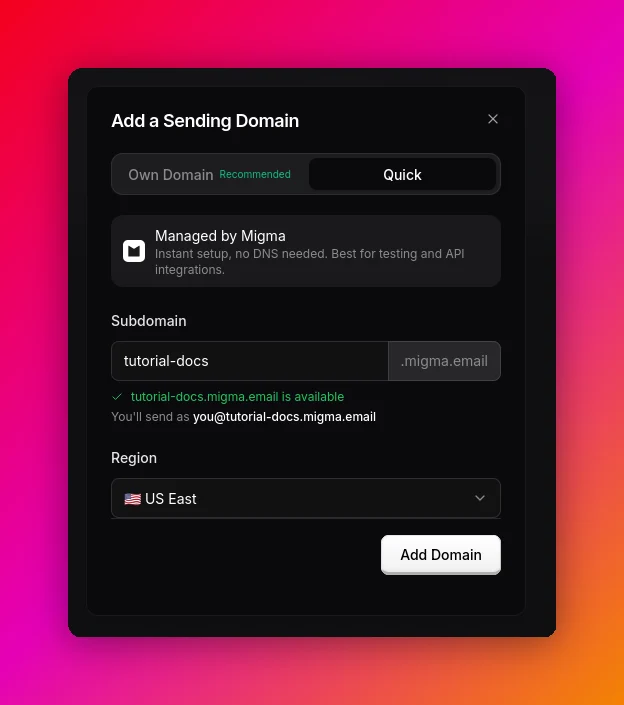 ***
## 1. Quick (migma.email)
Type a name and you get `.migma.email` instantly. No DNS, no waiting. Great for testing and quick integrations.
***
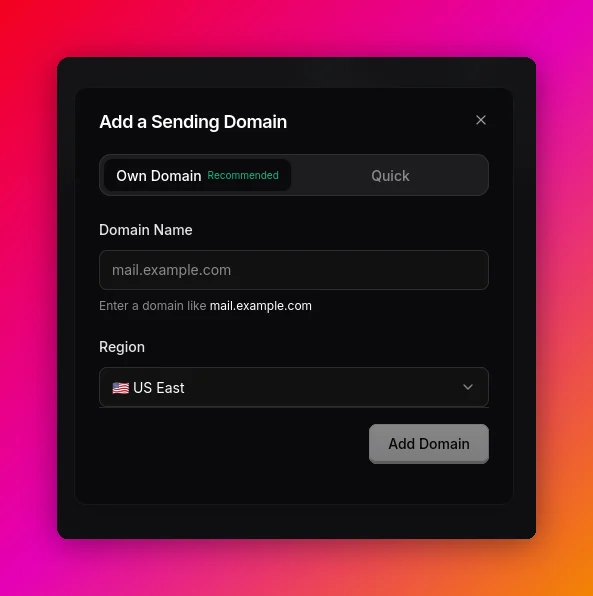
## 2. Custom domain
Send from your own address like `you@yourcompany.com`. Type your root domain, then click **Add Domain**. Migma assigns the sending region automatically.
In Migma, go to **Sending Domains**.
Click **Add Domain**, choose **Custom**, then enter the domain you want to send from.
Examples:
* `yourcompany.com`
* `mail.yourcompany.com`
* `updates.yourcompany.com`
Add the domain. Migma automatically assigns the sending region.
***
## 1. Quick (migma.email)
Type a name and you get `.migma.email` instantly. No DNS, no waiting. Great for testing and quick integrations.
***
## 2. Custom domain
Send from your own address like `you@yourcompany.com`. Type your root domain, then click **Add Domain**. Migma assigns the sending region automatically.
In Migma, go to **Sending Domains**.
Click **Add Domain**, choose **Custom**, then enter the domain you want to send from.
Examples:
* `yourcompany.com`
* `mail.yourcompany.com`
* `updates.yourcompany.com`
Add the domain. Migma automatically assigns the sending region.
 Using a sending subdomain such as `mail.yourcompany.com` is common because it keeps campaign reputation separate from your main website and day-to-day inbox domain.
***
## 3. Add the DNS records
After you add a custom domain, Migma shows every record you need to create. Keep this table open and copy each value directly into your DNS provider.
Using a sending subdomain such as `mail.yourcompany.com` is common because it keeps campaign reputation separate from your main website and day-to-day inbox domain.
***
## 3. Add the DNS records
After you add a custom domain, Migma shows every record you need to create. Keep this table open and copy each value directly into your DNS provider.
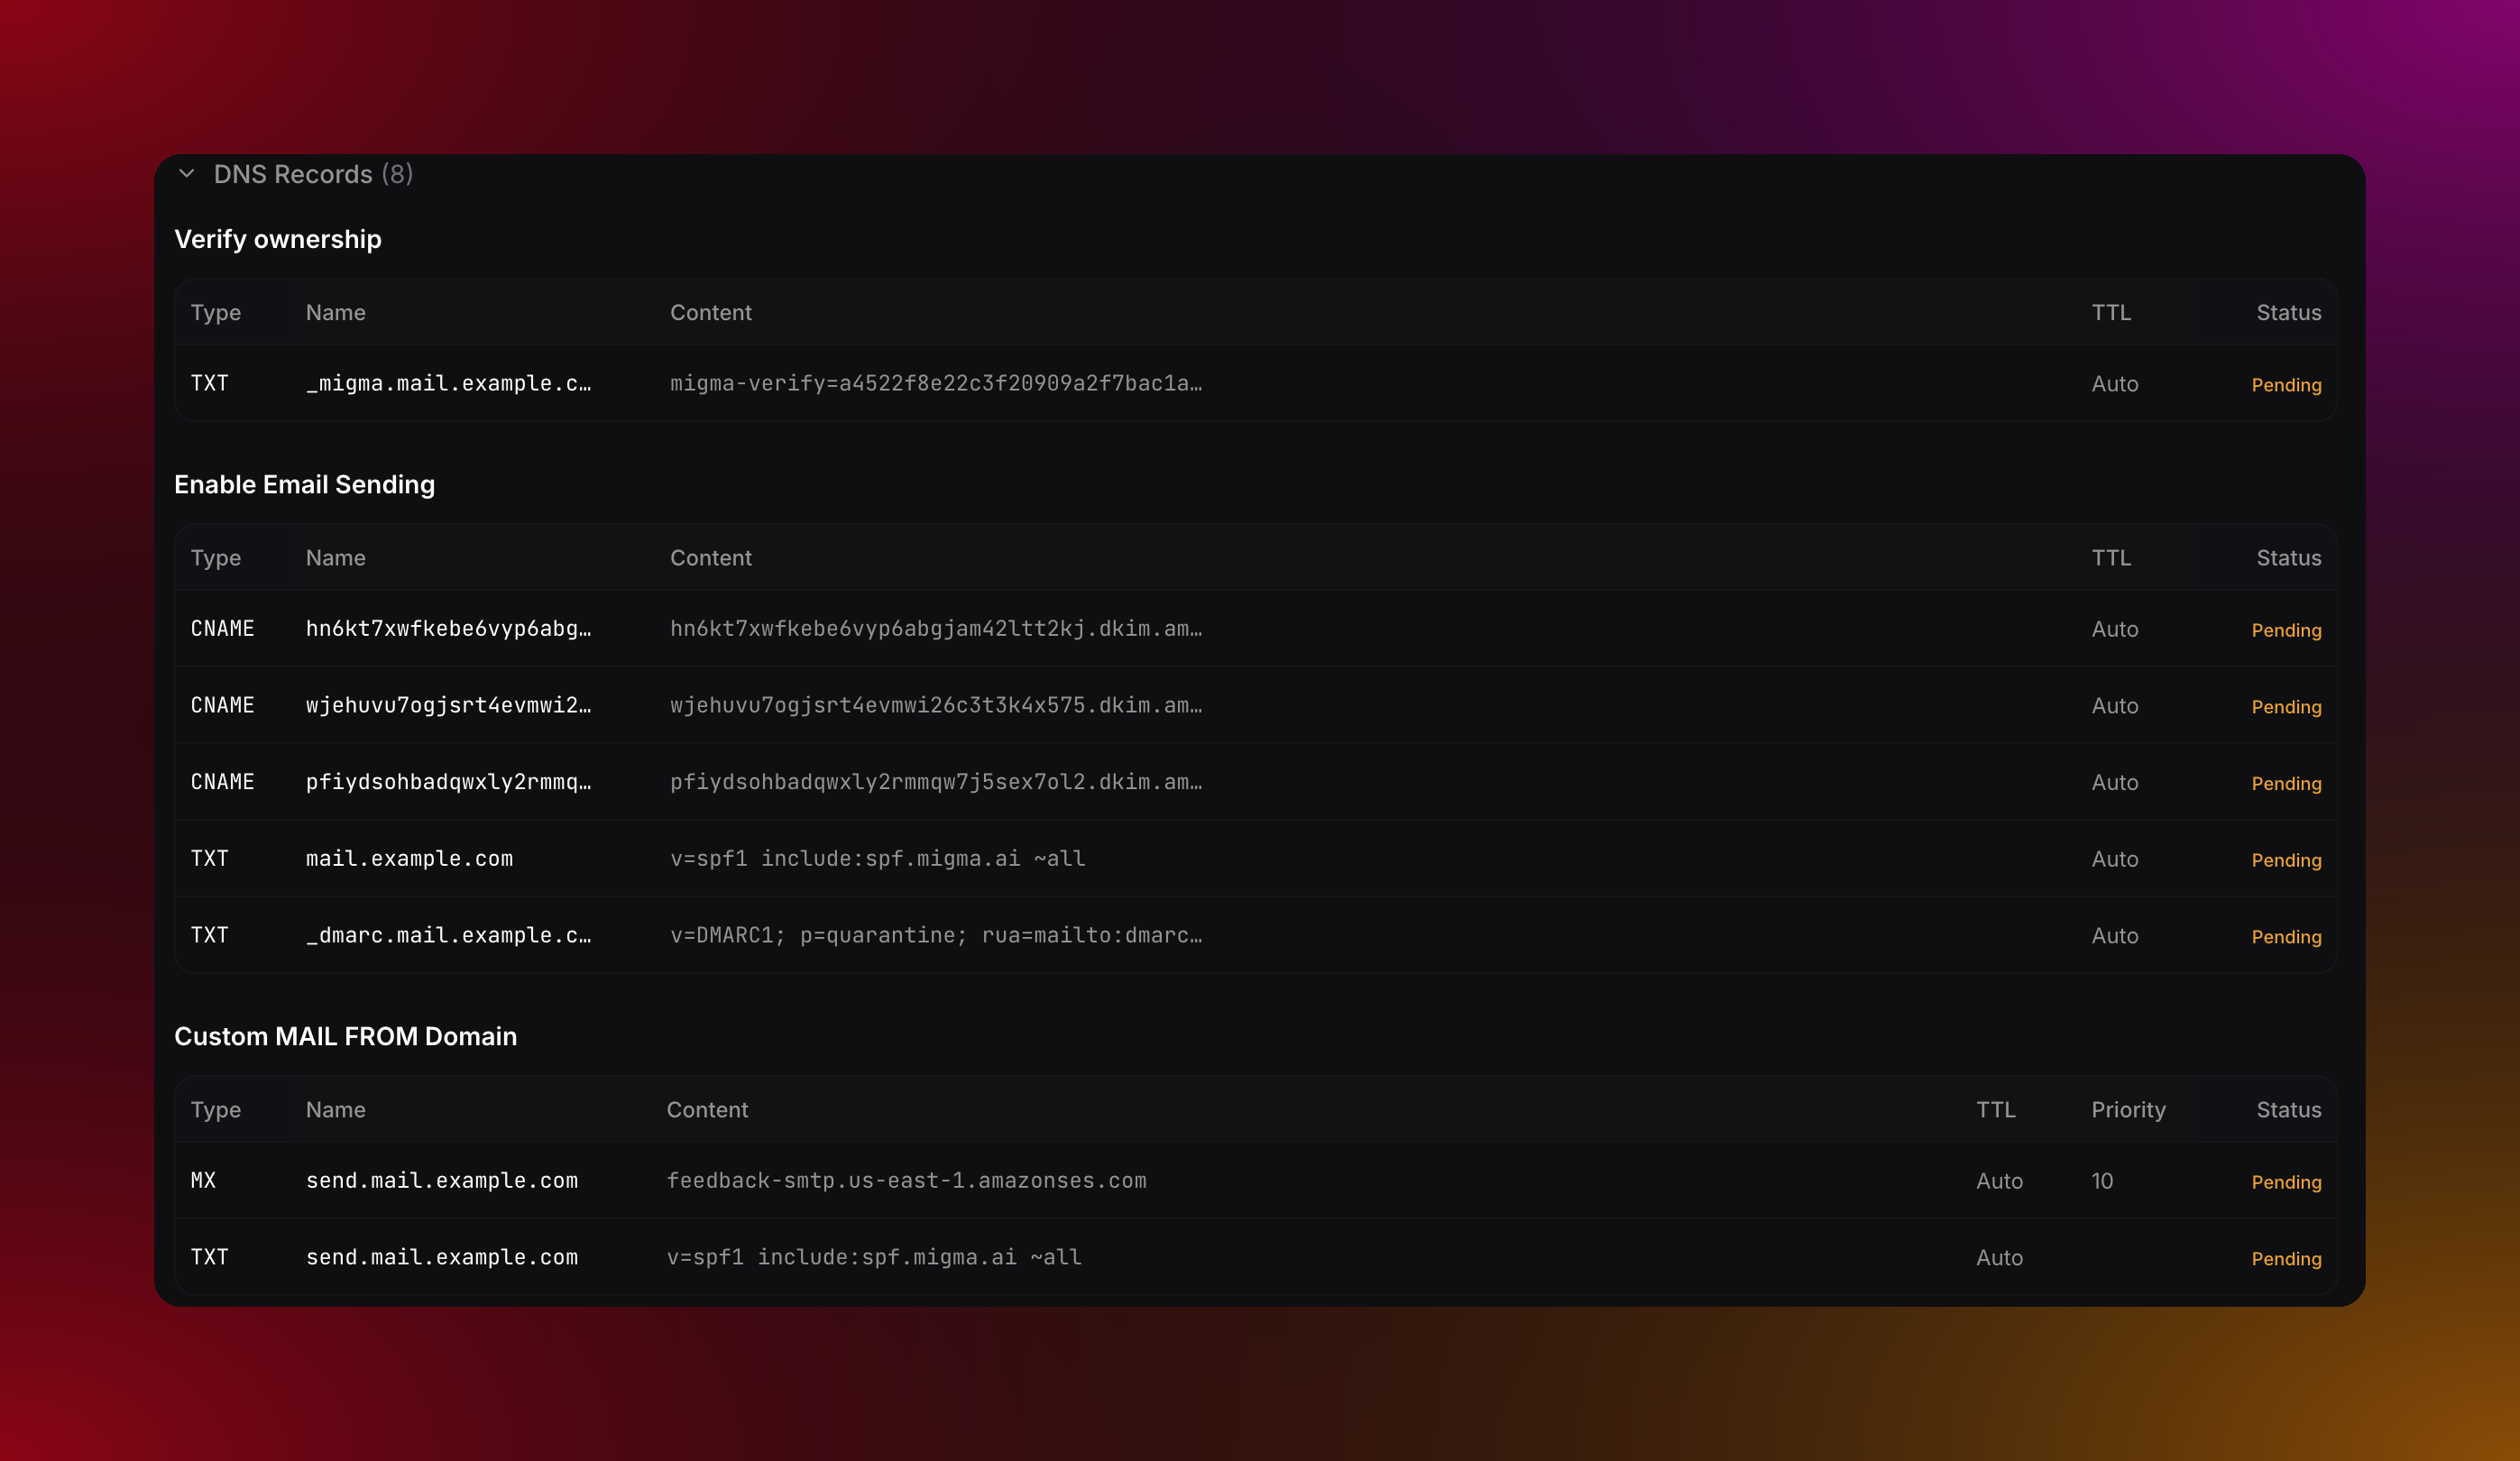 Most custom domains have these records:
| Purpose | Type | Where it goes |
| ------------------------- | ----- | --------------------------------- |
| Ownership verification | TXT | The sending domain |
| DKIM authentication | CNAME | Three `_domainkey` hostnames |
| SPF sending authorization | TXT | The sending domain |
| DMARC policy | TXT | `_dmarc` under the sending domain |
| Custom MAIL FROM | MX | `send` under the sending domain |
| MAIL FROM SPF | TXT | `send` under the sending domain |
Create a TXT record with the Migma verification value, such as `migma-verify=...`.
Create all three CNAME records. The names contain `_domainkey`, and the targets end in `dkim.amazonses.com`.
In Cloudflare, set DKIM CNAME records to **DNS only**. Do not proxy them.
Create or edit the SPF TXT record for the sending domain.
If there is no SPF record yet:
```txt theme={null}
v=spf1 include:spf.migma.ai ~all
```
If the domain already has SPF, keep one SPF TXT record and add Migma before the final mechanism:
```txt theme={null}
v=spf1 include:_spf.google.com include:spf.migma.ai ~all
```
Create the `_dmarc` TXT record exactly as Migma shows it.
```txt theme={null}
v=DMARC1; p=quarantine; rua=mailto:dmarc@migma.ai
```
Create the MX record for the MAIL FROM hostname, usually `send` under your sending domain.
* Priority: `10`
* Mail server: copy the Migma value, such as `feedback-smtp.eu-west-1.amazonses.com`
Create the TXT record on the same MAIL FROM hostname.
```txt theme={null}
v=spf1 include:spf.migma.ai ~all
```
On Cloudflare? Skip the manual records and use the one-click flow in [Cloudflare DNS](/sending-domains/cloudflare).
***
## 4. Verify in Migma
After saving the DNS records, return to Migma and check the domain.
Most DNS providers publish updates within 5-60 minutes. Some records can take longer.
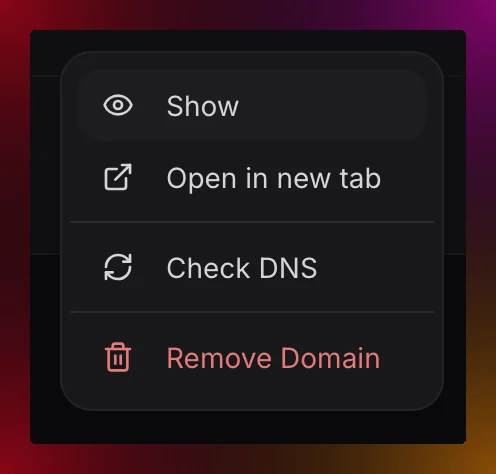
In **Sending Domains**, open the action menu for the domain.
Migma checks each record and updates the status.
Most custom domains have these records:
| Purpose | Type | Where it goes |
| ------------------------- | ----- | --------------------------------- |
| Ownership verification | TXT | The sending domain |
| DKIM authentication | CNAME | Three `_domainkey` hostnames |
| SPF sending authorization | TXT | The sending domain |
| DMARC policy | TXT | `_dmarc` under the sending domain |
| Custom MAIL FROM | MX | `send` under the sending domain |
| MAIL FROM SPF | TXT | `send` under the sending domain |
Create a TXT record with the Migma verification value, such as `migma-verify=...`.
Create all three CNAME records. The names contain `_domainkey`, and the targets end in `dkim.amazonses.com`.
In Cloudflare, set DKIM CNAME records to **DNS only**. Do not proxy them.
Create or edit the SPF TXT record for the sending domain.
If there is no SPF record yet:
```txt theme={null}
v=spf1 include:spf.migma.ai ~all
```
If the domain already has SPF, keep one SPF TXT record and add Migma before the final mechanism:
```txt theme={null}
v=spf1 include:_spf.google.com include:spf.migma.ai ~all
```
Create the `_dmarc` TXT record exactly as Migma shows it.
```txt theme={null}
v=DMARC1; p=quarantine; rua=mailto:dmarc@migma.ai
```
Create the MX record for the MAIL FROM hostname, usually `send` under your sending domain.
* Priority: `10`
* Mail server: copy the Migma value, such as `feedback-smtp.eu-west-1.amazonses.com`
Create the TXT record on the same MAIL FROM hostname.
```txt theme={null}
v=spf1 include:spf.migma.ai ~all
```
On Cloudflare? Skip the manual records and use the one-click flow in [Cloudflare DNS](/sending-domains/cloudflare).
***
## 4. Verify in Migma
After saving the DNS records, return to Migma and check the domain.
Most DNS providers publish updates within 5-60 minutes. Some records can take longer.
In **Sending Domains**, open the action menu for the domain.
Migma checks each record and updates the status.
 For per-provider field labels (Cloudflare, Route 53, GoDaddy, Namecheap) and troubleshooting, see the full [Add DNS Records](/sending-domains/add-dns-records) guide.