> ## Documentation Index
> Fetch the complete documentation index at: https://docs.migma.ai/llms.txt
> Use this file to discover all available pages before exploring further.
# Add DNS Records
> Copy Migma's sending-domain DNS records into Cloudflare, Route 53, GoDaddy, Namecheap, or another DNS provider.
## Overview
After you add a custom sending domain, Migma gives you DNS records for ownership, DKIM, SPF, DMARC, and the custom MAIL FROM return path. Add those records wherever your domain's nameservers are managed.
Migma sending domains are for permission-based email. Only send to people who expect email from your brand, and review [what you can send](/get-started/what-you-can-send) before sending campaigns.
***
## Before you start
You need:
* Access to your DNS provider, such as Cloudflare, Route 53, GoDaddy, Namecheap, Squarespace, Wix, or another host
* The Migma **Sending Domains** page open in another tab
* The exact domain you want to send from, often a sending subdomain such as `mail.yourcompany.com` or `updates.yourcompany.com`
Using a sending subdomain is common because it keeps campaign reputation separate from your main website and day-to-day inbox domain.
***
## Step 1: Add the domain in Migma
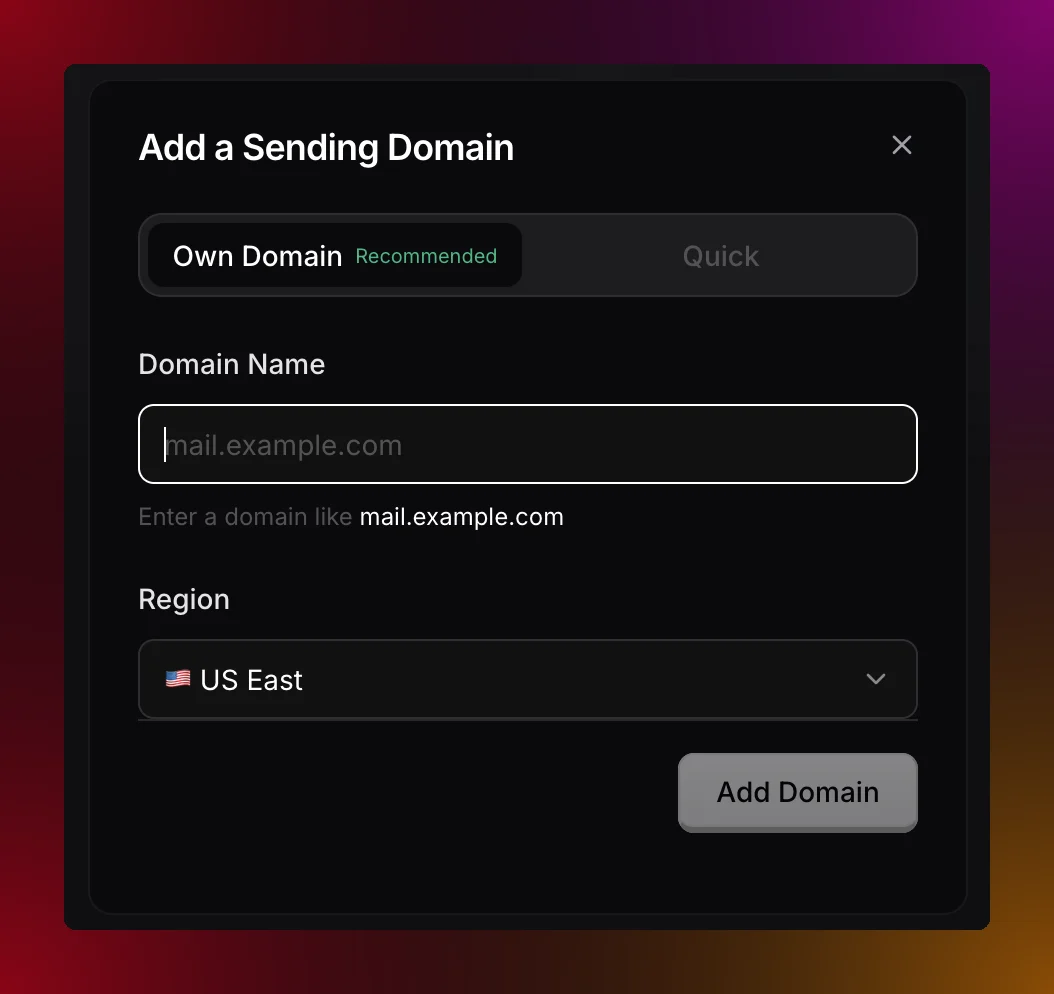
In Migma, go to **Sending Domains**.
Click **Add Domain**, choose **Custom**, then enter the domain you want to send from.
Examples:
* `yourcompany.com`
* `mail.yourcompany.com`
* `updates.yourcompany.com`
Add the domain. Migma automatically assigns the sending region.
 ***
## Step 2: Open the DNS records
Migma shows every record you need to create. Keep this table open and copy each value directly.
***
## Step 2: Open the DNS records
Migma shows every record you need to create. Keep this table open and copy each value directly.
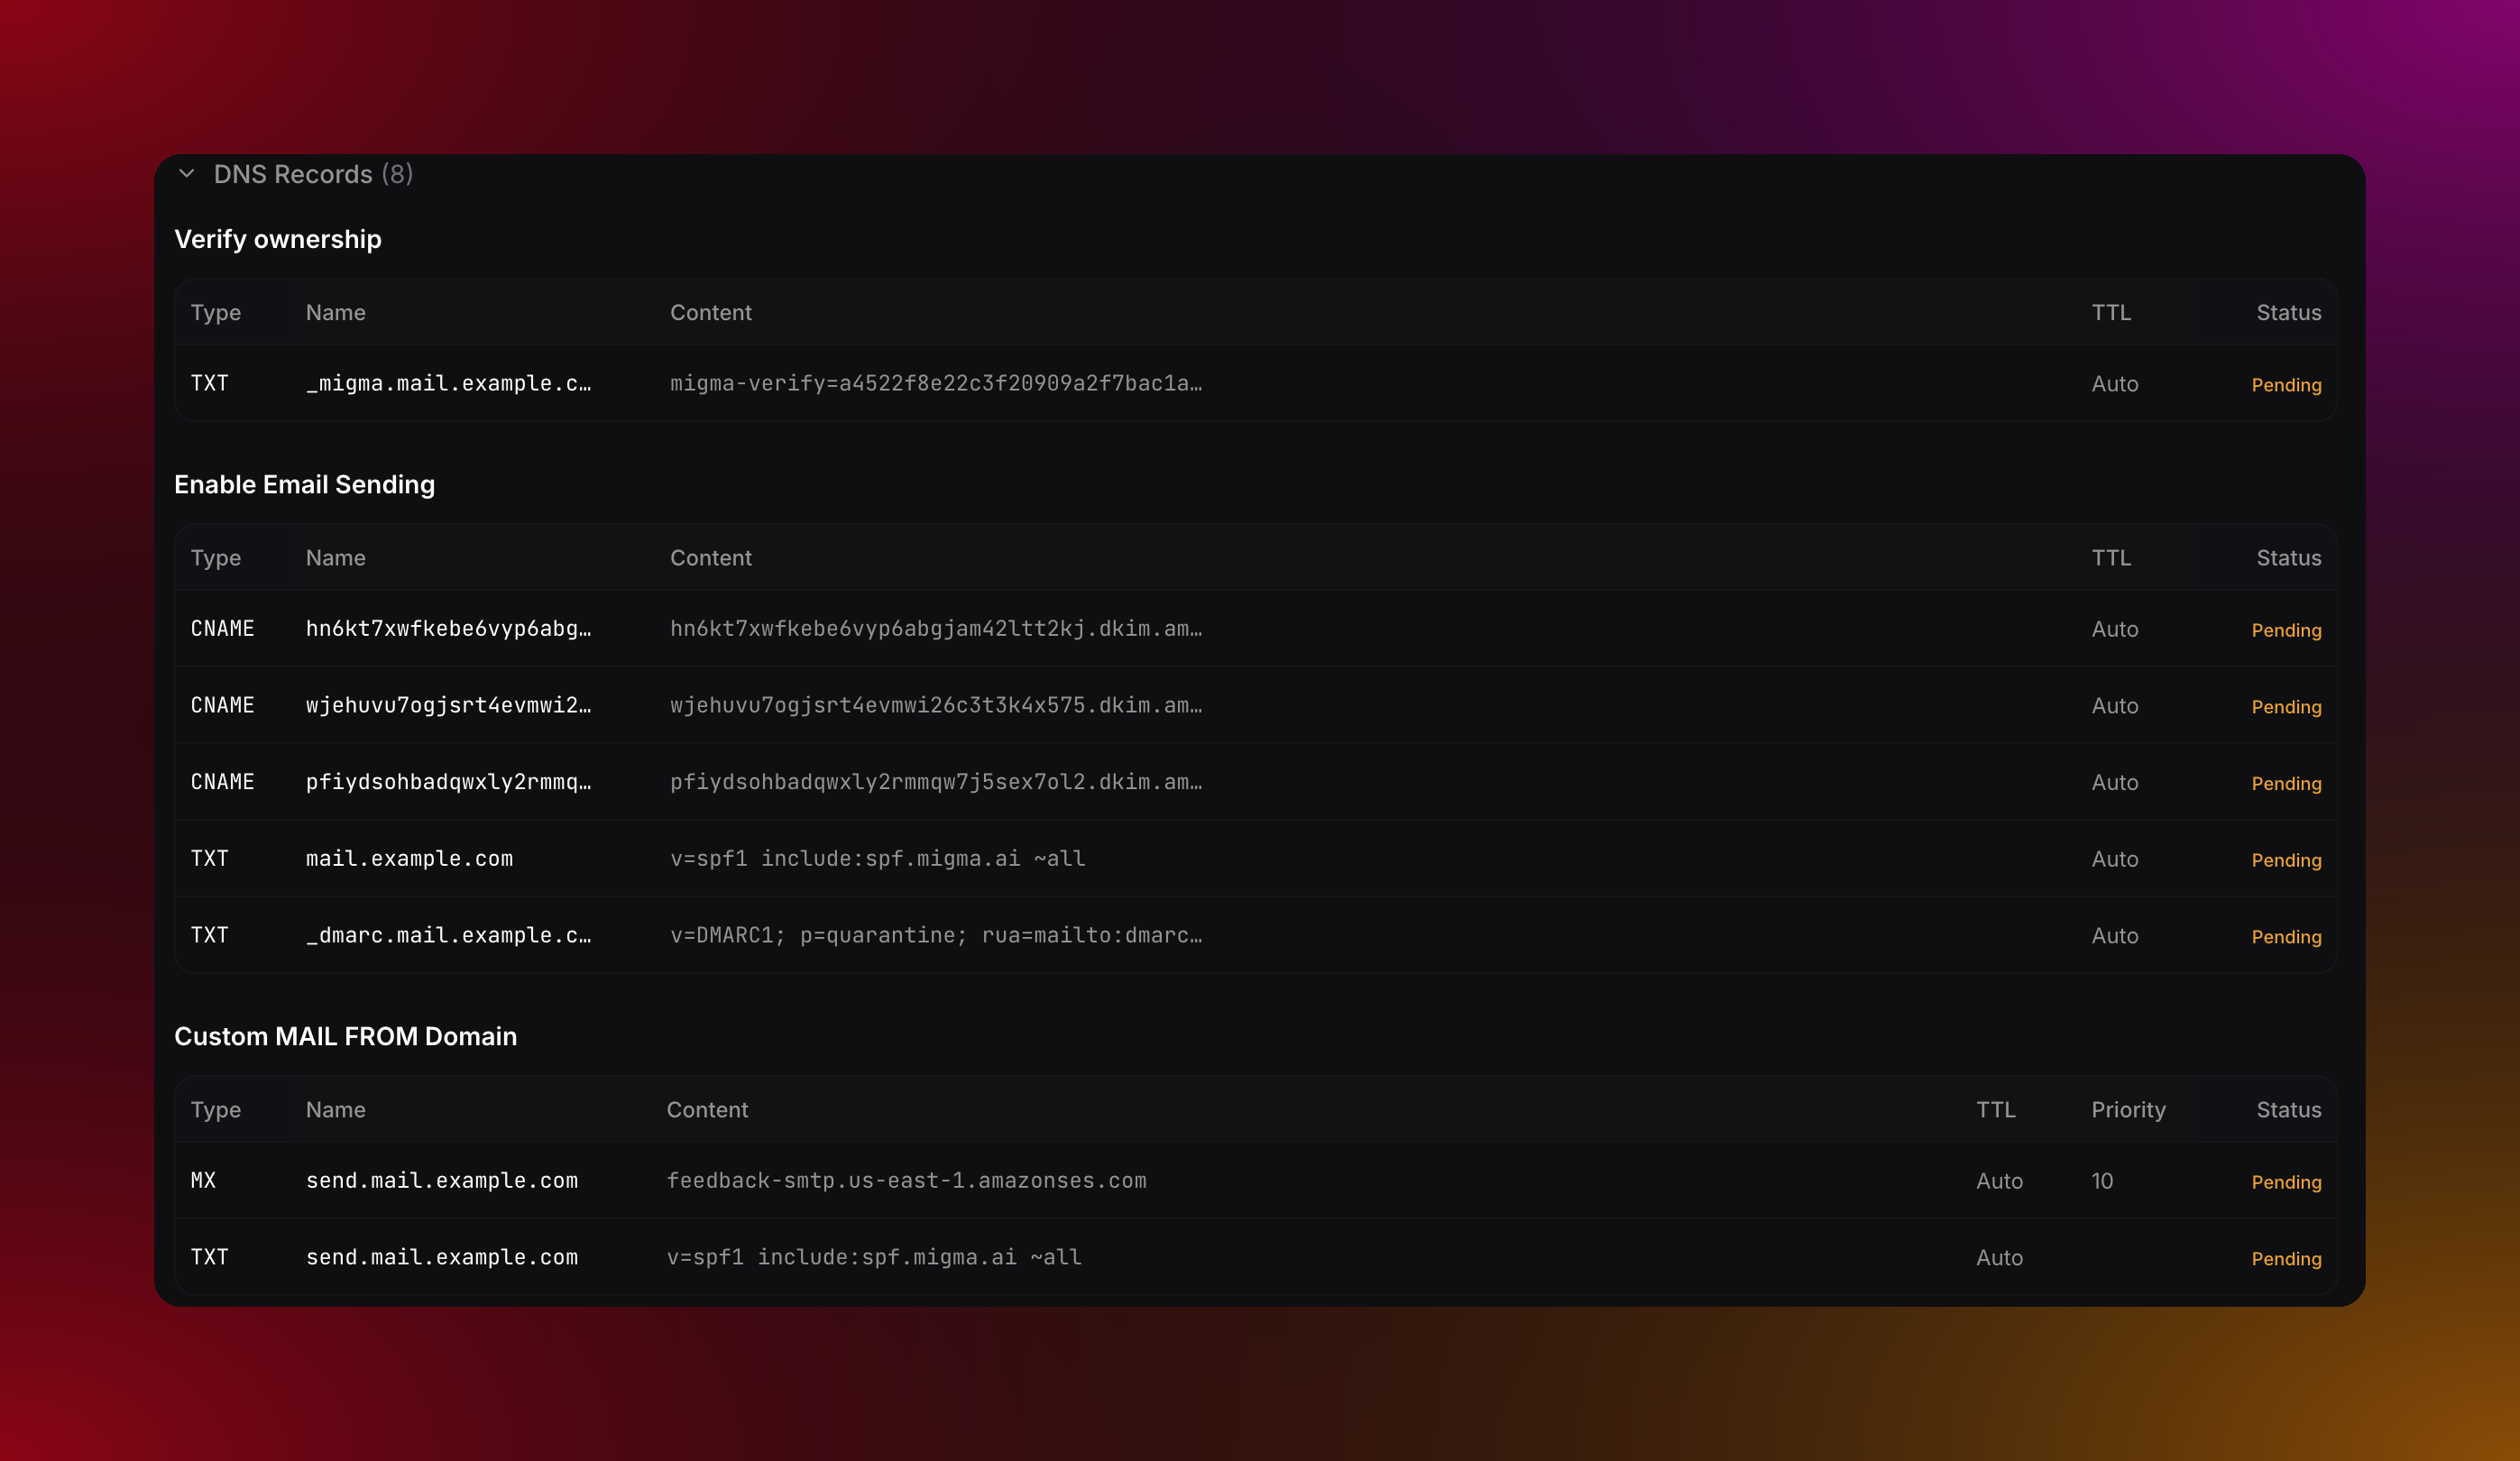 Most custom domains have 8 records:
| Purpose | Type | Where it goes |
| ------------------------- | ----- | --------------------------------- |
| Ownership verification | TXT | The sending domain |
| DKIM authentication | CNAME | Three `_domainkey` hostnames |
| SPF sending authorization | TXT | The sending domain |
| DMARC policy | TXT | `_dmarc` under the sending domain |
| Custom MAIL FROM | MX | `send` under the sending domain |
| MAIL FROM SPF | TXT | `send` under the sending domain |
If Migma shows **Custom MAIL FROM not configured**, add both pending MAIL FROM records: the MX record and the TXT record. The MX record needs priority `10`.
***
## Step 3: Translate the record name
DNS dashboards usually ask for a **Name**, **Host**, or **Record name**. This is the part most often entered incorrectly.
Use the name Migma shows, but make it relative to the DNS zone you are editing if your provider auto-appends the zone.
| Migma record name | DNS zone you are editing | Enter this name |
| ------------------------- | ------------------------ | ----------------------------------------- |
| `mail.example.com` | `example.com` | `mail` |
| `_dmarc.mail.example.com` | `example.com` | `_dmarc.mail` |
| `send.mail.example.com` | `example.com` | `send.mail` |
| `send.mail.example.com` | `mail.example.com` | `send` |
| `example.com` | `example.com` | `@` or leave blank, depending on provider |
Do not create `send` on the wrong zone. `send.mail-eu.example.com` and `send.mail-us.example.com` are different hostnames even though both can appear as `send` when you are editing separate delegated zones.
***
## Step 4: Add each record at your DNS provider
Create one DNS record for each row shown in Migma.
Create a TXT record with the Migma verification value, such as `migma-verify=...`.
Create all three CNAME records. The names contain `_domainkey`, and the targets end in `dkim.amazonses.com`.
In Cloudflare, set DKIM CNAME records to **DNS only**. Do not proxy them.
Create or edit the SPF TXT record for the sending domain.
If there is no SPF record yet:
```txt theme={null}
v=spf1 include:spf.migma.ai ~all
```
If the domain already has SPF, keep one SPF TXT record and add Migma before the final mechanism:
```txt theme={null}
v=spf1 include:_spf.google.com include:spf.migma.ai ~all
```
Create the `_dmarc` TXT record exactly as Migma shows it.
```txt theme={null}
v=DMARC1; p=quarantine; rua=mailto:dmarc@migma.ai
```
Create the MX record for the MAIL FROM hostname, usually `send` under your sending domain.
* Priority: `10`
* Mail server: copy the Migma value, such as `feedback-smtp.eu-west-1.amazonses.com`
Create the TXT record on the same MAIL FROM hostname.
```txt theme={null}
v=spf1 include:spf.migma.ai ~all
```
For TXT values, most DNS dashboards add quotes automatically. Paste the text value without surrounding quotes unless your provider specifically requires quoted TXT strings.
***
## Provider field guide
1. Open Cloudflare and select your zone.
2. Go to **DNS** -> **Records**.
3. Click **Add record**.
4. Copy the record type, name, and value from Migma.
5. For DKIM CNAME records, set **Proxy status** to **DNS only**.
6. Leave TTL as **Auto**.
Cloudflare may display full names after saving. That is normal as long as the resolved hostname matches the Migma record.
Reference: [Cloudflare DNS record guide](https://developers.cloudflare.com/dns/manage-dns-records/how-to/create-dns-records/)
1. Open the Route 53 console.
2. Go to **Hosted zones** and choose the hosted zone for your domain.
3. Click **Create record**.
4. Choose the type Migma shows.
5. Enter the record name relative to the hosted zone.
6. For MX, put priority `10` before the mail server if the UI uses one value field, or use the separate priority field if shown.
Reference: [Route 53 create records guide](https://docs.aws.amazon.com/Route53/latest/DeveloperGuide/resource-record-sets-creating.html)
1. Open your GoDaddy Domain Portfolio.
2. Select the domain, then open **DNS**.
3. Click **Add New Record**.
4. Use GoDaddy's **Name** field for the host prefix, without the domain name.
5. Use `@` only when the record is at the zone root.
6. Save each TXT, CNAME, and MX record from Migma.
Reference: [GoDaddy TXT record guide](https://www.godaddy.com/help/add-a-txt-record-19232)
1. Open **Domain List** in Namecheap.
2. Click **Manage** for the domain.
3. Open **Advanced DNS**.
4. In **Host Records**, click **Add New Record**.
5. Enter the host prefix in **Host**. Use `@` only for the zone root.
6. Save all Migma records.
Reference: [Namecheap TXT, SPF, DKIM, and DMARC guide](https://www.namecheap.com/support/knowledgebase/article.aspx/317/2237/how-do-i-add-txtspfdkimdmarc-records-for-my-domain/)
***
## Step 5: Verify in Migma
After saving the DNS records, return to Migma and check the domain.
Most DNS providers publish updates within 5-60 minutes. Some records can take longer.
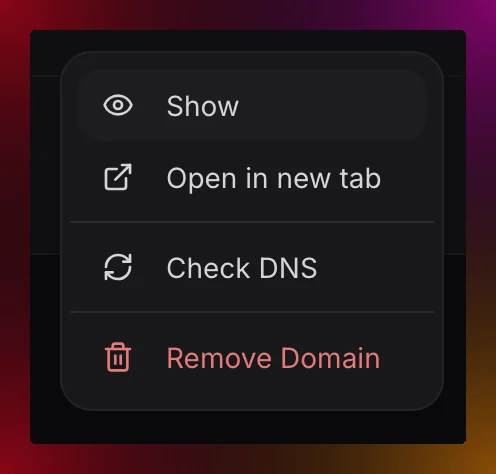
In **Sending Domains**, open the action menu for the domain.
Migma checks each record and updates the status.
Most custom domains have 8 records:
| Purpose | Type | Where it goes |
| ------------------------- | ----- | --------------------------------- |
| Ownership verification | TXT | The sending domain |
| DKIM authentication | CNAME | Three `_domainkey` hostnames |
| SPF sending authorization | TXT | The sending domain |
| DMARC policy | TXT | `_dmarc` under the sending domain |
| Custom MAIL FROM | MX | `send` under the sending domain |
| MAIL FROM SPF | TXT | `send` under the sending domain |
If Migma shows **Custom MAIL FROM not configured**, add both pending MAIL FROM records: the MX record and the TXT record. The MX record needs priority `10`.
***
## Step 3: Translate the record name
DNS dashboards usually ask for a **Name**, **Host**, or **Record name**. This is the part most often entered incorrectly.
Use the name Migma shows, but make it relative to the DNS zone you are editing if your provider auto-appends the zone.
| Migma record name | DNS zone you are editing | Enter this name |
| ------------------------- | ------------------------ | ----------------------------------------- |
| `mail.example.com` | `example.com` | `mail` |
| `_dmarc.mail.example.com` | `example.com` | `_dmarc.mail` |
| `send.mail.example.com` | `example.com` | `send.mail` |
| `send.mail.example.com` | `mail.example.com` | `send` |
| `example.com` | `example.com` | `@` or leave blank, depending on provider |
Do not create `send` on the wrong zone. `send.mail-eu.example.com` and `send.mail-us.example.com` are different hostnames even though both can appear as `send` when you are editing separate delegated zones.
***
## Step 4: Add each record at your DNS provider
Create one DNS record for each row shown in Migma.
Create a TXT record with the Migma verification value, such as `migma-verify=...`.
Create all three CNAME records. The names contain `_domainkey`, and the targets end in `dkim.amazonses.com`.
In Cloudflare, set DKIM CNAME records to **DNS only**. Do not proxy them.
Create or edit the SPF TXT record for the sending domain.
If there is no SPF record yet:
```txt theme={null}
v=spf1 include:spf.migma.ai ~all
```
If the domain already has SPF, keep one SPF TXT record and add Migma before the final mechanism:
```txt theme={null}
v=spf1 include:_spf.google.com include:spf.migma.ai ~all
```
Create the `_dmarc` TXT record exactly as Migma shows it.
```txt theme={null}
v=DMARC1; p=quarantine; rua=mailto:dmarc@migma.ai
```
Create the MX record for the MAIL FROM hostname, usually `send` under your sending domain.
* Priority: `10`
* Mail server: copy the Migma value, such as `feedback-smtp.eu-west-1.amazonses.com`
Create the TXT record on the same MAIL FROM hostname.
```txt theme={null}
v=spf1 include:spf.migma.ai ~all
```
For TXT values, most DNS dashboards add quotes automatically. Paste the text value without surrounding quotes unless your provider specifically requires quoted TXT strings.
***
## Provider field guide
1. Open Cloudflare and select your zone.
2. Go to **DNS** -> **Records**.
3. Click **Add record**.
4. Copy the record type, name, and value from Migma.
5. For DKIM CNAME records, set **Proxy status** to **DNS only**.
6. Leave TTL as **Auto**.
Cloudflare may display full names after saving. That is normal as long as the resolved hostname matches the Migma record.
Reference: [Cloudflare DNS record guide](https://developers.cloudflare.com/dns/manage-dns-records/how-to/create-dns-records/)
1. Open the Route 53 console.
2. Go to **Hosted zones** and choose the hosted zone for your domain.
3. Click **Create record**.
4. Choose the type Migma shows.
5. Enter the record name relative to the hosted zone.
6. For MX, put priority `10` before the mail server if the UI uses one value field, or use the separate priority field if shown.
Reference: [Route 53 create records guide](https://docs.aws.amazon.com/Route53/latest/DeveloperGuide/resource-record-sets-creating.html)
1. Open your GoDaddy Domain Portfolio.
2. Select the domain, then open **DNS**.
3. Click **Add New Record**.
4. Use GoDaddy's **Name** field for the host prefix, without the domain name.
5. Use `@` only when the record is at the zone root.
6. Save each TXT, CNAME, and MX record from Migma.
Reference: [GoDaddy TXT record guide](https://www.godaddy.com/help/add-a-txt-record-19232)
1. Open **Domain List** in Namecheap.
2. Click **Manage** for the domain.
3. Open **Advanced DNS**.
4. In **Host Records**, click **Add New Record**.
5. Enter the host prefix in **Host**. Use `@` only for the zone root.
6. Save all Migma records.
Reference: [Namecheap TXT, SPF, DKIM, and DMARC guide](https://www.namecheap.com/support/knowledgebase/article.aspx/317/2237/how-do-i-add-txtspfdkimdmarc-records-for-my-domain/)
***
## Step 5: Verify in Migma
After saving the DNS records, return to Migma and check the domain.
Most DNS providers publish updates within 5-60 minutes. Some records can take longer.
In **Sending Domains**, open the action menu for the domain.
Migma checks each record and updates the status.
 ***
## Common issues
This usually means the full record name was pasted into a field that expected only the host prefix.
Example problem: entering `send.mail.example.com` in the `example.com` zone creates `send.mail.example.com.example.com`.
Fix it by changing the name to `send.mail`.
A domain should have one TXT record that starts with `v=spf1`. If one already exists, edit it and add `include:spf.migma.ai` before `~all` or `-all`.
In Cloudflare, DKIM CNAME records must be **DNS only**. Email authentication records cannot use the orange proxy cloud.
Check both MAIL FROM records. The MX record and TXT record must use the same hostname, usually `send` under the sending domain.
Amazon SES requires the custom MAIL FROM domain to have exactly one MX record for that hostname. If another service already owns that hostname, remove the old record or use a different sending domain.
Your registrar is not always your DNS host. Check your nameservers, then add Migma records at the provider listed there.
***
## References
These provider docs informed the field labels and DNS-entry rules in this tutorial:
* [Cloudflare: create DNS records](https://developers.cloudflare.com/dns/manage-dns-records/how-to/create-dns-records/)
* [Amazon Route 53: create records in the console](https://docs.aws.amazon.com/Route53/latest/DeveloperGuide/resource-record-sets-creating.html)
* [Amazon SES: custom MAIL FROM domains](https://docs.aws.amazon.com/ses/latest/dg/mail-from.html)
* [GoDaddy: add a TXT record](https://www.godaddy.com/help/add-a-txt-record-19232)
* [Namecheap: add TXT, SPF, DKIM, and DMARC records](https://www.namecheap.com/support/knowledgebase/article.aspx/317/2237/how-do-i-add-txtspfdkimdmarc-records-for-my-domain/)
* [Resend: managing sending domains](https://resend.com/docs/dashboard/domains/introduction)
***
## Common issues
This usually means the full record name was pasted into a field that expected only the host prefix.
Example problem: entering `send.mail.example.com` in the `example.com` zone creates `send.mail.example.com.example.com`.
Fix it by changing the name to `send.mail`.
A domain should have one TXT record that starts with `v=spf1`. If one already exists, edit it and add `include:spf.migma.ai` before `~all` or `-all`.
In Cloudflare, DKIM CNAME records must be **DNS only**. Email authentication records cannot use the orange proxy cloud.
Check both MAIL FROM records. The MX record and TXT record must use the same hostname, usually `send` under the sending domain.
Amazon SES requires the custom MAIL FROM domain to have exactly one MX record for that hostname. If another service already owns that hostname, remove the old record or use a different sending domain.
Your registrar is not always your DNS host. Check your nameservers, then add Migma records at the provider listed there.
***
## References
These provider docs informed the field labels and DNS-entry rules in this tutorial:
* [Cloudflare: create DNS records](https://developers.cloudflare.com/dns/manage-dns-records/how-to/create-dns-records/)
* [Amazon Route 53: create records in the console](https://docs.aws.amazon.com/Route53/latest/DeveloperGuide/resource-record-sets-creating.html)
* [Amazon SES: custom MAIL FROM domains](https://docs.aws.amazon.com/ses/latest/dg/mail-from.html)
* [GoDaddy: add a TXT record](https://www.godaddy.com/help/add-a-txt-record-19232)
* [Namecheap: add TXT, SPF, DKIM, and DMARC records](https://www.namecheap.com/support/knowledgebase/article.aspx/317/2237/how-do-i-add-txtspfdkimdmarc-records-for-my-domain/)
* [Resend: managing sending domains](https://resend.com/docs/dashboard/domains/introduction)