> ## Documentation Index
> Fetch the complete documentation index at: https://docs.migma.ai/llms.txt
> Use this file to discover all available pages before exploring further.
# Designing in Figma for Email
> Set up your Figma file so Migma converts it into a clean, reliable email.
## Overview
Email is not a poster. It is a stack of rows that has to render the same way in Gmail, Outlook, Apple Mail, and on every phone. Migma reads the structure of your Figma frame, plus a picture of it, and rebuilds it as real email. The closer your file is to how email actually works, the better the result.
**The one rule: design like an email, not a free canvas.** Stack content from top to bottom, in clean named layers, with real text and real images. Every guideline below follows from that.
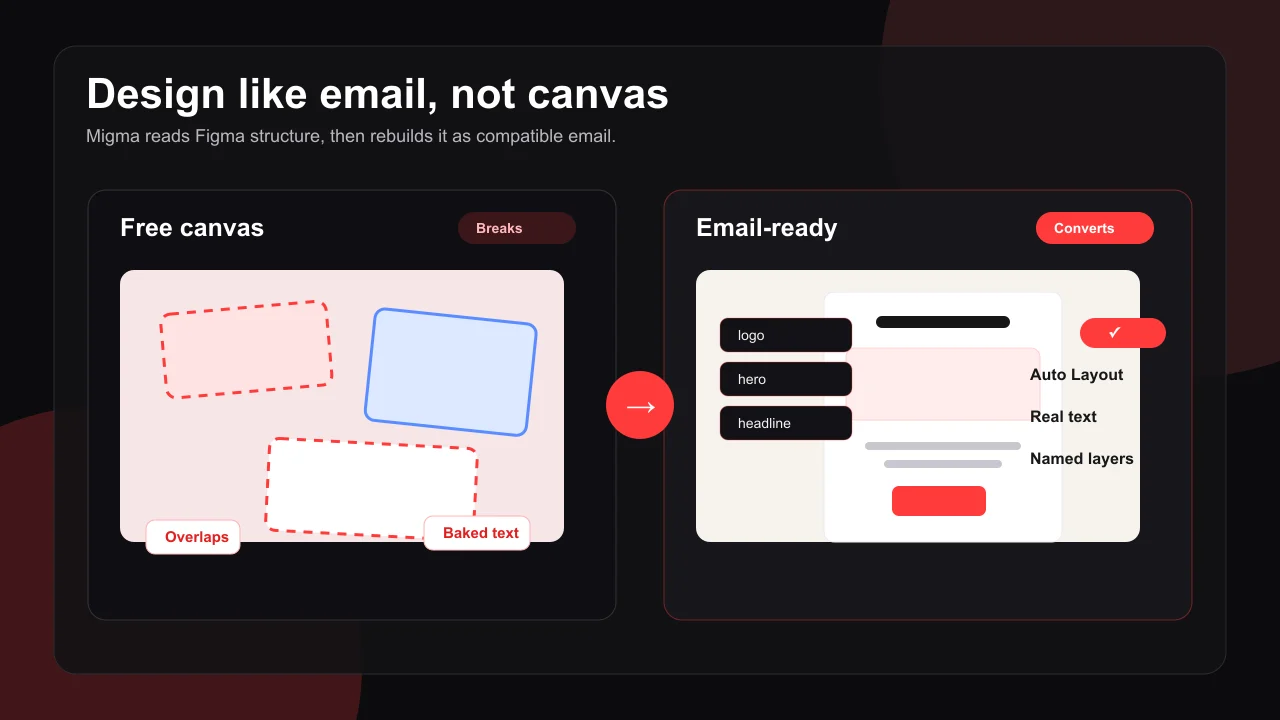 Stack sections vertically, group columns horizontally, never free position.
Never bake words or buttons into a picture.
Crop and resize before placing, and keep files light.
Export vectors as PNG instead of leaving live paths.
Use real names like logo and hero, not Frame 1.
Figma freezes GIFs, so add motion after import.
***
## Build with Auto Layout
Email flows from top to bottom and cannot place one element on top of another. Auto Layout is how you tell Migma the way your sections stack and sit beside each other.
**Do**
* Wrap the whole email in a vertical Auto Layout frame, with each section as a child
* Use horizontal Auto Layout for columns and icon rows
* Keep one main column, around 600px wide
**Don't**
* Use free-floating layers or hand-placed positions
* Overlap elements, because email cannot stack one layer on another, so overlaps flatten or disappear
***
## Keep text and buttons out of images
Headlines, body copy, and buttons must be real text and real buttons, never part of a picture. This is the most common mistake, and it breaks email in ways that look perfectly fine in Figma.
**Do**
* Keep every headline and paragraph as a live text layer
* Build buttons as a real shape with a separate text label
* For a photo behind a headline, put the text above or below it, or over a solid color block
**Don't**
* Bake text into an image, because it cannot be edited, translated, or read by screen readers, and it disappears when a client blocks images
* Bake a button into an image, because it is not a real, clickable link
Text or buttons placed on top of a photo are the number one reason an imported design looks broken in the inbox. Keep them as their own layers.
***
## Use real images, sized for email
Migma exports each image straight from your frame, so what you place is what you get.
**Do**
* Crop and resize each image to its final size in your image editor before placing it
* Aim for hero images around 1200px wide and content images around 600px
* Keep files light, because oversized images can be dropped during import and leave a gap
**Don't**
* Drop a giant full-resolution photo onto the canvas and crop it with Figma's crop tool, because the heavy original is what gets processed and can fail quietly
***
## Flatten icons and illustrations
Email cannot render vector artwork reliably, so Migma converts your vectors into images. A flattened layer converts far cleaner than a stack of vector paths.
**Do**
* Export logos and custom illustrations as a flattened PNG, then place that image
* For social icons, name the layer after the platform, like Instagram, Facebook, or X, so Migma drops in a crisp icon
**Don't**
* Leave logos, icons, and illustrations as live vector shapes or large groups of paths, because they convert into fuzzy or broken images
***
## Name your layers
Layer names are not only for you. Migma reads them to understand what each block is, and image names become the alt text in the final email.
**Do**
* Name layers for what they are, like `logo`, `hero`, `headline`, `nav`, `footer`, or `product-photo`
* Give every image a real, human name, because it becomes the alt text
**Don't**
* Ship the defaults like `Frame 1`, `Group 27`, `Vector`, or `Rectangle`, because Migma has to guess what they are
***
## Skip animation in Figma
Figma exports a single still frame, so any animation you place in Figma arrives frozen.
**Do**
* Import the static design, then add an animated GIF inside Migma, where animated images are supported
**Don't**
* Place a GIF in Figma expecting it to move, because it arrives as one frozen frame
***
## Quick checklist
| Do | Don't |
| --------------------------------------------- | ------------------------------------------ |
| Vertical Auto Layout, one column around 600px | Free-floating or overlapping layers |
| Real text and real buttons | Text or buttons baked into a photo |
| Crop and size images before placing | Huge photos cropped with Figma's crop tool |
| Flatten icons and art to PNG | Live vectors and groups of paths |
| Name layers (`logo`, `hero`, `footer`) | `Frame 1`, `Vector`, `Group 27` |
| Add animation in Migma after import | GIFs placed in Figma |
***
## Import your file
When your file follows these guidelines, importing is the easy part. Connect Figma, copy the link to your frame, and bring it in.
Connect Figma and convert your frame step by step.
No Figma file? Turn a screenshot into an email.
How Migma keeps emails rendering everywhere.
Stack sections vertically, group columns horizontally, never free position.
Never bake words or buttons into a picture.
Crop and resize before placing, and keep files light.
Export vectors as PNG instead of leaving live paths.
Use real names like logo and hero, not Frame 1.
Figma freezes GIFs, so add motion after import.
***
## Build with Auto Layout
Email flows from top to bottom and cannot place one element on top of another. Auto Layout is how you tell Migma the way your sections stack and sit beside each other.
**Do**
* Wrap the whole email in a vertical Auto Layout frame, with each section as a child
* Use horizontal Auto Layout for columns and icon rows
* Keep one main column, around 600px wide
**Don't**
* Use free-floating layers or hand-placed positions
* Overlap elements, because email cannot stack one layer on another, so overlaps flatten or disappear
***
## Keep text and buttons out of images
Headlines, body copy, and buttons must be real text and real buttons, never part of a picture. This is the most common mistake, and it breaks email in ways that look perfectly fine in Figma.
**Do**
* Keep every headline and paragraph as a live text layer
* Build buttons as a real shape with a separate text label
* For a photo behind a headline, put the text above or below it, or over a solid color block
**Don't**
* Bake text into an image, because it cannot be edited, translated, or read by screen readers, and it disappears when a client blocks images
* Bake a button into an image, because it is not a real, clickable link
Text or buttons placed on top of a photo are the number one reason an imported design looks broken in the inbox. Keep them as their own layers.
***
## Use real images, sized for email
Migma exports each image straight from your frame, so what you place is what you get.
**Do**
* Crop and resize each image to its final size in your image editor before placing it
* Aim for hero images around 1200px wide and content images around 600px
* Keep files light, because oversized images can be dropped during import and leave a gap
**Don't**
* Drop a giant full-resolution photo onto the canvas and crop it with Figma's crop tool, because the heavy original is what gets processed and can fail quietly
***
## Flatten icons and illustrations
Email cannot render vector artwork reliably, so Migma converts your vectors into images. A flattened layer converts far cleaner than a stack of vector paths.
**Do**
* Export logos and custom illustrations as a flattened PNG, then place that image
* For social icons, name the layer after the platform, like Instagram, Facebook, or X, so Migma drops in a crisp icon
**Don't**
* Leave logos, icons, and illustrations as live vector shapes or large groups of paths, because they convert into fuzzy or broken images
***
## Name your layers
Layer names are not only for you. Migma reads them to understand what each block is, and image names become the alt text in the final email.
**Do**
* Name layers for what they are, like `logo`, `hero`, `headline`, `nav`, `footer`, or `product-photo`
* Give every image a real, human name, because it becomes the alt text
**Don't**
* Ship the defaults like `Frame 1`, `Group 27`, `Vector`, or `Rectangle`, because Migma has to guess what they are
***
## Skip animation in Figma
Figma exports a single still frame, so any animation you place in Figma arrives frozen.
**Do**
* Import the static design, then add an animated GIF inside Migma, where animated images are supported
**Don't**
* Place a GIF in Figma expecting it to move, because it arrives as one frozen frame
***
## Quick checklist
| Do | Don't |
| --------------------------------------------- | ------------------------------------------ |
| Vertical Auto Layout, one column around 600px | Free-floating or overlapping layers |
| Real text and real buttons | Text or buttons baked into a photo |
| Crop and size images before placing | Huge photos cropped with Figma's crop tool |
| Flatten icons and art to PNG | Live vectors and groups of paths |
| Name layers (`logo`, `hero`, `footer`) | `Frame 1`, `Vector`, `Group 27` |
| Add animation in Migma after import | GIFs placed in Figma |
***
## Import your file
When your file follows these guidelines, importing is the easy part. Connect Figma, copy the link to your frame, and bring it in.
Connect Figma and convert your frame step by step.
No Figma file? Turn a screenshot into an email.
How Migma keeps emails rendering everywhere.